

How To Get Youtube To Stop Changing My Quaility
How to Permanently Change YouTube Video Quality
Finish adjusting YouTube'southward settings for every video. Here'due south how to permanently set video quality on desktop and mobile.

When watching a video on YouTube, your network connection automatically determines the default video quality. But did you know that yous can change the quality of the YouTube video so that information technology looks ameliorate or to save data?
Rather than changing this setting for every video, we're going to show you how to set YouTube video quality permanently for both mobile and desktop.
What Are the YouTube Video Quality Options?
In April 2021, YouTube adjusted how its video quality settings piece of work on Android and iOS. Now, you lot can gear up a default video quality when your device is connected to Wi-Fi or a cellular network.
There are four different YouTube video quality options:
- Auto, which changes the video quality depending on your current network weather, screen size, and quality of the original video.
- Higher picture quality, which shows you videos in 720p resolution or higher and uses more than data.
- Information saver, which shows you lower-quality videos simply is handy if yous want to salve data.
- Advanced, which lets you select specific video quality. It's the only selection that allows you to do this.
If you've noticed that the video quality is not constant from i video to another, it means you lot're currently using the Auto option. How much data YouTube consumes depends on your streaming quality.
Comport in listen that you'll never be able to view a video in a resolution higher than information technology was uploaded in. For example, if a video was uploaded in 480p, information technology can't exist viewed in 720p or 1080p.
Information technology's inconvenient to alter these quality settings for every video, so at present we're going to show you how to permanently set up the quality on mobile and desktop. Information technology's ane of the many YouTube tricks you should exist using.
How to Fix YouTube Video Quality Permanently on Mobile
On mobile, you tin can select a permanent video quality option beyond YouTube using available video quality settings. Here's how:
- Launch the YouTube app and tap your account display photo in the upper right.
- Select Settings.
- Tap Video quality preferences. Adjacent, if you use iOS, you need to select On mobile networks or On Wi-Fi on the side by side page.
- Beneath Video quality on mobile networks/Wi-Fi, select either Higher pic quality or Information saver.
One matter you'll detect is there's no option to select a specific video resolution. To do that, you accept to select the Advanced option, which is only bachelor during video playback.
To practice this, follow these steps:
- Play any video on the YouTube mobile app.
- Tap anywhere in the video player window.
- Tap the three dots or the Gear icon in the upper right.
- Select Quality and tap Advanced from the popular-up.
- Tap a specific video quality. Your video will start playing in the selected video quality.
Continue in mind that the available options will depend on the original quality of the uploaded video. Likewise, this setting isn't permanent. It'll change once you go to some other video.
How to Set YouTube Video Quality Permanently on Desktop
On desktop, there isn't an official way of setting the default video quality. Luckily, unlike browser extensions can help you lot gear up permanent video quality across YouTube on your desktop.
On Edge and Chrome:
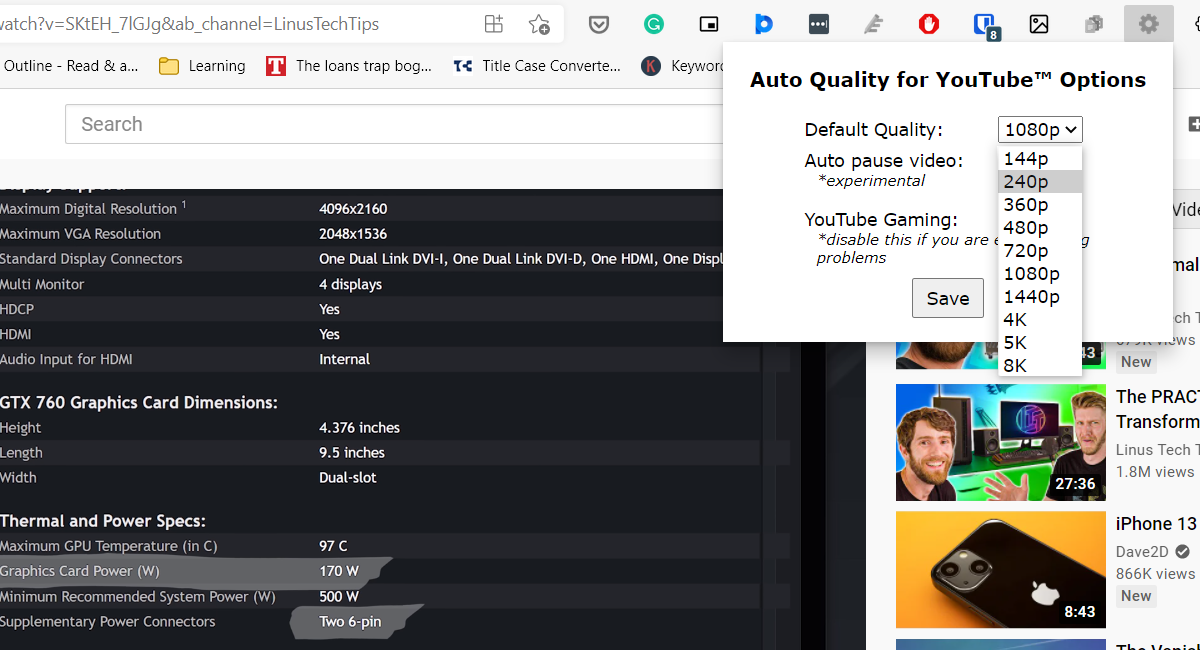
- Go to Motorcar Quality for YouTube in the Chrome Web Store.
- Click Add to Chrome and click Add extension from the pop-up.
- Become to YouTube via your browser.
- Click the Motorcar Quality for YouTube icon on the browser extension menu.
- Select the drop-down carte adjacent to Default Quality and choose your preferred quality for YouTube videos.
- Click Relieve to finish. Refresh YouTube for your preferred quality settings to become into event.
On Firefox:
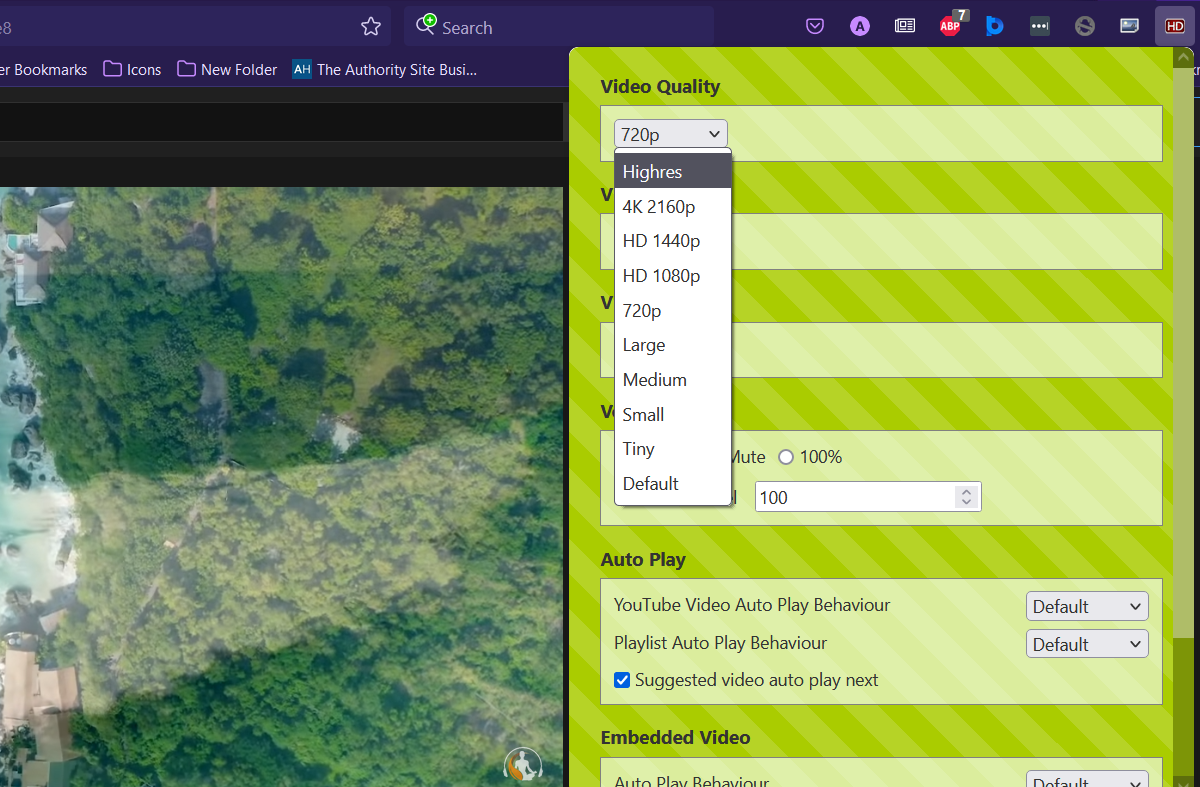
- Go to the YouTube High Definition extension for Firefox.
- Tap Add to Firefox, and so select Add from the pop-upwardly. Check Let this extension to run in Private Windows if yous desire to, then click Okay.
- Go to YouTube and play whatsoever video.
- Click the YouTube Loftier Definition icon in the upper right.
- Use the Video quality drop-down and select your preferred video quality. The extension will load your preferred quality instantly.
Remember, if you set a default YouTube video quality and the video yous're watching doesn't have that pick bachelor, these browser extensions will select the highest available quality setting. While you tin can watch a 1440p video on a 1080p brandish, you should beware of the dissimilar things that happen when you lot exercise so.
Take Control of YouTube's Video Quality
YouTube's video quality options can be confusing at first. But with the tips highlighted above, you lot can permanently watch videos in your desired quality.
It's one of the many YouTube tips and tricks that you lot can learn.
Source: https://www.makeuseof.com/how-to-change-youtube-video-quality-permanently/
Posted by: holstboyss1985.blogspot.com
0 Response to "How To Get Youtube To Stop Changing My Quaility"
Post a Comment